Showing posts with label PowerBI. Show all posts

Hire a PowerBI guru

I've recently hired a PowerBI analyst to join my team in my full-time industry job. In 3 short months, he's built 3 amazing PowerBI dashboards that have given us tremendous insight in to our accounting data such as the composition of our Journal Entries, our fluctuation (flux) explanations, and our Month End Close Status. It's been a tremendous win.

He started his career as a data engineer, and then taught himself PowerBI from materials like this available online. He's already been awarded our company's high honor quarterly CFO award: the first time someone on my team has won in the last three years. I've been trying to teach accountants how to use these Power tools, but hiring someone who has already made the effort, has been a huge win. I can't wait until the market starts to have more people like him available as they are a key part of my accounting strategy for winning. 

So my key takeaway, hire a PowerBI guru if you can. Make the case; they will quickly pay for themselves with their insights (and make you look like a rockstar)!

And if you are the guru already, send me a message, and let's talk. Maybe I have a project or work that you can help me with. 

How Do You Learn Best?

Since building this blog, I've wondered what's the best way to get this information out to the masses of accountants and finance professionals who could really benefit from the automation that PowerBI, Power Query and Power Pivot provide.

In the beginning I tinkered with making some videos and doing live presentations, but I got a lot of feedback that people needed step-by-step instructions and use cases so they could play with the tools and make them their own. However, I wonder what's the best way for you to learn?

Leave me your vote in the comments.
A. Videos posted on this blog, YouTube, or even TikTok (yikes)
B. Live instruction
C. This blog 

Prior post: Transforming a PDF
Next post: Coming soon

Transforming a PDF

For this next exercise, we will build our PowerBI skills further, automating cleaning up the data within the PowerBI application. The post is a continuation of the work that was started in the post, Convert PDF Using PowerBI. In the original exercise, we took a PDF file and converted it to a visualization using PowerBI; now, we will perform transformation work to the PDF file before reloading it to the data visualization. 


The Scenario

In this series of exercises, the goal is to pull a list of all names from a PDF. In the first exercise, we just loaded the data as is; however, if you compare the source PDF file to the final visualization, many of the names are missing, with the PowerBI visualization matrix only displaying the names that start from the PDF section Randy Travis.

To begin the transformation process, let's start where we left off in the prior PDF lesson: with the Solution file. Open the Solution PowerBI file (or your prior exercise workbook), and then navigate to the PowerQuery Editor within PowerBI by selecting the query Table025 (Page 11). Right click and select "Edit Query".


Process the data

You've now entered the Power Query Editor: the same one used for Power Query in Excel. 

Looking at the data, there's a few things we need to address to get to our goal: a list of all names.
  • Column2 has a rouge name (Nicole Lopez).
  • Column1 includes characters (i.e, 2019-10) preceding the name.
  • Columns 1, 2 & 6 each contain names, but we them all in a single list..
Let's tackle these clean-up items one-by-one. 

Addressing the rouge Name in Column2

To fix the name hanging out by itself in Column2, we will combine Column1 and Column2, by adding a Conditional Column. The Conditional Column will be called "1st column" and will look at Column2 and if Column2 has a value of null, then populate [1st column] with the value from Column1. If not null, then it will populate the value from Column2. This is very similar to the manual Excel process of creating a new column and then using an IF statement to populate each row. 
ln the PowerBI Power Query Editor ribbon, select Add Column, then Conditional Column,
When the "Add Conditional Column" menu opens, populate the fields as shown in the image below. Remember Power Query is case sensitive so "null" must be lowercase. 


After selecting "OK", there will be an extra column named [1st column]. By default, Power Query always adds new columns to the far right of your dataset. 

Now, we've got the names from Column1 and Column2 in one column. However, we also have extra data (i.e., 2019-10) in the column that we need to remove. Time for the second cleanup exercise.


Remove digits preceding names

To isolate the name, we need to remove the digits that precede them (i.e., 2019-10). We will use something similar to Excel's Text to Columns: Split Column by Delimiter. 

Click on the header for the new column, [1st column], highlighting the entire column. In the ribbon, on the Home menu, select the Split Column option, then By Delimiter.


In the Split Column by Delimiter menu, select Space from the drop down menu, and then Left-most delimiter. This will split [1st column] in to two columns based on the first space it finds, reading left to right. {I love the extra flexibility Split Column offers, such as Left-most, compared to the similar Excel version!}
In the new column [1st column.2], the first few rows look as expected and appear to have achieved the objective. However, as you scroll further down, you can see that "Nicole" is separated from her last name "Lopez". This happened because "Nicole Lopez" didn't have a space in front of it, and so the Left-most Space used to split the column was the space between "Nicole" and "Lopez". There are several approaches we could take to address this issue, but for this exercise we will focus on modifying an existing formula.

Modify Formula for Conditional Column

When we created [1st column], we used the Conditional Column menu to create an if statement that returned Column2's value when Column2 had a value. But, if instead of returning just Column2's value, we returned Column1 + Column2, then the data in Column2 will look the same as Column1. Since the columns look the same after the revision, the Split Column by Delimiter step will work the same, resulting in the correct result for the name of "Nicole Lopez".


If you haven't turned on your formula bar, go to the View menu on the ribbon and check the box "Formula bar". This is a one time set-up.

Now in the Applied Steps area of the Power Query Editor, select the step named "Added Conditional Column". 

Selecting an Applied Step changes the Preview to show the data how it looked after that step was performed, but before the subsequent steps. It also updates the formula bar to show the M language formula used to create that step. 


Good news is that you don't have to learn the M language in order to make some easy changes using it. In this case, we are going to modify the portion referring to the results of the new Conditional Column. In the formula above, it says if [Column2] is not null then [Column2]. We'll modify the very end of the formula to say "then [Column1]&[Column2]". You can make that change by directly typing in the formula bar above.

An ampersand is used in Power Query to indicate "and", or to join two words together. After pasting in the "[Column1]&" in the formula bar, it should read as follows. Now if we look at the [1st column], all columns have a "2019-##" and a name. 


In the [1st column] there is one last issue left to clean-up: there is a space missing on Row 11. Similar to above, we are going to manually type in the instructions to the formula bar. To add text to a column in Power Query, surround texts by quotation marks. Adding a space then is, " "; quotation marks with a space between them. The final modified formula looks like this, and the person listed on Row 11, aligns with the other rows. Even better, you've created the rules once, and if this ever occurs again in the future, the directions are written, and the process will be lightning fast.


Remove other columns
Power Query works faster when you remove any unnecessary columns. Since for this exercise all we need is a final list of names, we can tell Power Query to remove all other columns, leaving only the [1st column.2]. Do so by selecting [1st column.2], right clicking and selecting the option "Remove Other Columns". 
Combine columns within the same query

We now have a column that shows all the cleaned-up names from Column1, but we need to add to it the names in Column6. The good news is that the Column6 names are already cleaned up, so no work is required there, 

For this trick, I'm going to show you how to append a Table within the same query, combining the new [1st column] with Column6; in plain English, I'm going to show you how to get the new Column1 and Column6 in to a single name column.

Let's start by renaming [1st column.2] to "Column6". This aligns the name of the two columns that contain names: the column we cleaned up and the original column6. The append functions combines columns together based on their headers, so ensure it's spelled exactly the same way including capitalization. Rename a column by double clicking the header. 


Next, we will use the append function. In the ribbon, under Home, you'll find Append on the far right. Select the first option, Append Queries. Append makes a current list longer, by lining up data from multiple columns with the same headers.


In the pop-up Append menu, in the Table to append dropdown, select the current query, Table025 (Page 11). This option results in the query appending to itself. Notice in the preview area how the list of names restarts on row 17.
What we need to do next is to change the Append formula manually to look at a version of the query where the original Colunm6 is still included, and then Append that version of the Table to the version that has Column1 renamed as Column6. Essentially, next we need to combine both lists of names from the original columns 1 and 6. Instead of writing the formula from scratch, we used the Power Query menu options to do the hard work, and we will tweak the formula for this scenario. I totally geek out on tricks like these, and how much they expand your capabilities in Power Query, with minimal investment. 

If you select on the Applied Step for Appended Query, it will show the formula for that step in the formula bar. Reading the formula from left to right it says "Combine Tables that are located at the Applied Step Renamed Columns with the Table at the same Applied Step Renamed Columns". 


To modify the formula, we will replace one of the Renamed Columns references with a reference to an Applied Step that contained Column6. We got rid of Column6 when we performed the step Removed Other Columns; so a Step where Column6 was still in the Table was the Changed Type1 Step. 
So while in the Appended Query Applied Step, we are going to replace one of the references to Renamed Columns with the Changed Type1 step. Remember that Power Query is case sensitive, so be sure to spell exactly as shown. The # proceeding the reference indicates that you are referring to a Step in the query, and if a Step is more than one word, quotation marks should surround it. Here's how the final modified formula will look.


Alternatively, you also could have swapped the order and placed Changed Type1 first and Renamed Columns last.

Now that you've manually updated the formula, you'll notice two changes: 1) it's pulled back in all the rows that you removed previously, and 2) Column6 now includes names from both columns of the original table. 

Repeat the step to Remove Other Columns, keeping only Column6, and you have a single clean list of names, converted from a PDF to a Power BI query.


Next post: Coming soon


Direct query

Today, November 7, 2022, I saw that Microsoft has finally launched Direct Query, which allows users to connect to an existing PowerBI dataset. I've been waiting for this feature since I started using PowerBI and PowerQuery in 2018.

It does appear to be in Beta, and so I did have to enable the ability to Preview this feature, but I got prompted as soon as I selected the option to connect to PowerBI Datasets, and the directions were easy to follow.

Since it's brand new, I'm obviously still playing around with it, but was glad to see that my favorite datasets were easy to connect to once the option was selected. I'm really hoping this functionality improves some refresh times. Instead of reconnecting to a source and performing the necessary transformations, I'm optimistic that I'll be able connect directly to the transformed dataset going forward.


Instructions

Ready to get started? Here's a link to Microsoft's instructions for Connecting PowerBI reports to existing PowerBI datasets.


Here's the link to Microsoft's instructions for Connecting Excel to existing PowerBI datasets. 


Have you tried Direct Query? Please leave comments on your experience below. 


Convert PDF using PowerBI

Just joining the blog? Explore prior lessons here

A PDF file isn't built for complex data analysis, but can hold lots of data we want to analyze. In this exercise, I will show how easy it is to convert a PDF to a data visualization using PowerBI. 


The Scenario

You can follow along with this exercise by downloading the source PDF file saved here: PDF.

Let's assume you work in compliance for a large accounting firm in New Mexico. Each quarter, one of your tasks is to go through the NM Accountancy Board Newsletter and pull a list of all people with Disciplinary Reports. 

Flipping through the newsletter, you will find the data for this exercise on Page 11. 


Choose Data

Haven't downloaded the PowerBI Desktop app yet? Instructions available in this prior post under the header, Install.

Open the application PowerBI Desktop, and let's get started. 

Start in the Home menu, then select Get data, scrolling down to the bottom to select More... The More option expands to show more than 100 connections that are already built-in to PowerBI. 

At the time of this writing, the PDF option was listed at the top of the All section. If you don't see it quickly, use the Search functionality in the same menu.

Once PDF is selected, then choose Connect. 
In the Open menu pop-up, browse to the location where the downloaded PDF has been saved. 

Next, the Navigator menu will open, showing a few different options for selecting the data from page 11. Below I've selected the three Page 11 options to highlight them, but we only need to select one to load. To decide which option to select, click on each Page 11 to view the preview.


The option Table025 (Page 11) shows the data that we are after, without the extra text from the top of page 11. So select the option Table025 (Page 11), then Load.


Create Visualization


Now that the data has been loaded, it's time to transform it in to a Visualization. 
 
In Power BI, the Matrix Visualization is a standard menu option, and it resembles a Pivot Table. It's an easy first Visualization type for accountants learning PowerBI, since it aligns with the pivots many of us are so familiar with.


Similar to using Excel's Pivot Table Fields List, in Power BI there are a list of Fields to choose from based on the Data that was loaded above. In this example, since we didn't clean the data before using it, the Column names are generic: Column 5 and Column 6. You can then drag and drop fields in to the Visualizations area, immediately below the area where you select the Matrix option.

After adding the field Column 6 to the Rows area, the Matrix looks like the following, which lists some of the names from one of the columns of the Table we loaded. 


While I hope that most of my readers have moved completely away from PDFs, on those occasions where PDFs can't be avoided, I hope this exercise helps transform a manual process to something more automated.  

In the next PDF lesson, we'll continue working with this PDF, but explore how to get both columns with names in to the Matrix, using transformation tools in the PowerQuery Editor.

In this lesson, you learned:
  • How to load data to PowerBI;
  • How to convert a PDF to a Visualization in PowerBI; and
  • What a Matrix Visualization is and how to build it.


PowerBI and PowerPivot


On its own, investing in learning Power Query can provide enormous benefits by automating data transformation.

But once data is loaded in to Power Query, you have set yourself on a path that leads to the Data Model, Power Pivot, and being able to create Pivot reports with multiple massive datasets and custom formulas.

It's a truly incredible world that awaits and which will provide enormous long-term benefits. Plus it's free, already baked in to an application you know, love, and use daily (Excel).


Even better, you are getting a 2 for 1 special!!!

Microsoft's Power BI was built using virtually the same processes. Learn it first in Excel, then open up the Power BI Dashboard (also free) and you'll find an extremely similar layout in the Power BI Power Query Editor, Modeling, and table or matrix visualizations. Plus, you'll open another entire world of visualizations and BI tools.


PowerBI Exercise

Let's do a sneak peek exercise in Power BI. It's a repeat of the last three lessons (Load Data, Refresh, Process GL data), but in a brand new tool.


Install


To install
PowerBI Desktop, go to PowerBI.microsoft.com. Review system requirements. Power BI is a powerful data analytic tool. For optimal performance, consider working with your technology partners to ensure your machine at least meets the Recommended specifications.

Download exercise files


This exercise starts with the same source files previously downloaded in the Load Data post. If needed, select the "Download" icon below each of the two exercise files. Save & close.

Bank account listing


GL Balances


Once in the Power BI Desktop application, close the initial pop-up menu, and let's start with the blank canvas.


Load Data


In the ribbon, go to the Home tab, and select "Get Data" > "Excel".

Browse to the exercise file "Bank account listing".

On the pop-up Navigator screen, select the box for “Sheet1”, which will provide a preview of the "Bank account listing" file. Select "Load".
The Bank account listing is now loaded in PowerBI and can be modified in the Power Query Editor. On the right hand side Fields section, the query name defaulted to the worksheet name, Sheet1. Let's change the name to "Bank_acct_LU" by double clicking the name "Sheet1" and typing over it.

Note the Fields section includes the column headers from the "Bank account listing" file. 

Select all of the Fields, which will then generate a report in a table format.
On the bottom right corner, select the Focus Mode to see the full table. Does this all feel and look similar?

Let's repeat these steps and load the source file "GL Balances" and name the query "GL_bal_Data".

Refresh


In Excel, let's manually change the GL Balance in the source file to either 0.99 or 1000.99, then save and close the file.

In the Power BI Dashboard, in the Fields section, GL_bal_Data, select the … for a menu of More Options. Select "Refresh
data".

The balance in the query is now updated to reflect the Excel change.

Process GL Data


Let's open the Power Query Editor, where data processes can be automated. In the Power BI Dashboard, in the Fields section, GL_bal_Data, select the … for a menu of More Options. Select "Edit query". 


Split Column by Delimiter


Let's start by isolating the 4-digit GL account number in to its own column.  

Select the "Account" column by clicking on "Account". On the Home tab, select "Split Column", then "By Delimiter".

Change the "Select or enter delimiter" to "--Custom--" and a dash "-". Select to Split at the "Left-most delimiter". "Ok".

Power BI has now split the account column, guessed that the data type of the new column is a Whole Number (123) and recorded the steps under Applied Steps.


Repeat the same step to split the "Dept" column.  Change the type for Dept.1 to Text. On the column header, click on the "123". Select "ABC Text".


Clean up
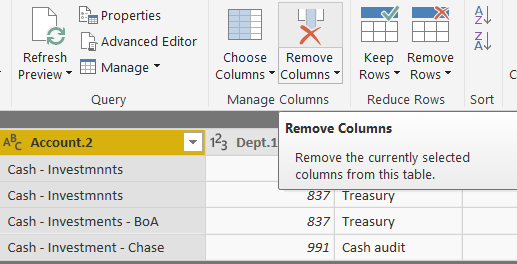


Let's do some clean up. Remove the column "Account.2" by selecting it, which highlights the column, and then selecting "Remove Columns" from the menu above.

Next, rename the columns "GL Account", "Dept", "Dept Name" and "Balance" by double clicking on the current column headers.


Type


Let's change the GL Account column to data type "Text".  On the column header, click on the "123".  Select "ABC Text".

Now, select the column "Balance". On the Home tab, select "Data Type: Decimal Number" and change it to "Fixed decimal number".

This is one area which varies from Excel vs Power BI: the format is the same with a dollar sign and two decimal places but one calls it "Currency" and the other "Fixed decimal number".


TRIM


First, select each of the three Text columns holding down Ctrl. Then, on the Transform menu, select Format > Trim
.

If you've walked through both exercises in Excel and PowerBI, now you should see the 2 for 1 special that you are getting! According to Microsoft, there's a potential 4 for 1 special, since SQL Server Data Tools for SQL Server 2017 Analysis Services and Azure Analysis Services are also leveraging the same Power Query Editor platform; however, since many accountants aren't using these tools, it's a 2 for 1 special (with potential for more).

💥BEST PRACTICE TIP
As you start to explore on your own and Google how to perform new processes, alternate using "Power Query" or "PowerBI" in your search terms to get expanded results.💥
In this lesson, you learned in Power BI how to:
  • Install,
  • Load data,
  • Refresh data for changes,
  • Split a column by a delimiter,
  • Remove and rename columns,
  • Change data types, and
  • Use Trim to remove excess spaces.

SOLUTION


Prior post: Process GL Data
Next post: Process Bank Account Listing


💬Before this exercise had you worked with PowerBI? Help shape future exercises by letting me know your experience level in the comments below.