On its own, investing in learning Power Query can provide enormous benefits by automating data transformation.
But once data is loaded in to Power Query, you have set yourself on a path that leads to the Data Model, Power Pivot, and being able to create Pivot reports with multiple massive datasets and custom formulas.
It's a truly incredible world that awaits and which will provide enormous long-term benefits. Plus it's free, already baked in to an application you know, love, and use daily (Excel).

Even better, you are getting a 2 for 1 special!!!
Microsoft's Power BI was built using virtually the same processes. Learn it first in Excel, then open up the Power BI Dashboard (also free) and you'll find an extremely similar layout in the Power BI Power Query Editor, Modeling, and table or matrix visualizations. Plus, you'll open another entire world of visualizations and BI tools.

To install PowerBI Desktop, go to PowerBI.microsoft.com. Review system requirements. Power BI is a powerful data analytic tool. For optimal performance, consider working with your technology partners to ensure your machine at least meets the Recommended specifications.

This exercise starts with the same source files previously downloaded in the Load Data post. If needed, select the "Download" icon below each of the two exercise files. Save & close.
Microsoft's Power BI was built using virtually the same processes. Learn it first in Excel, then open up the Power BI Dashboard (also free) and you'll find an extremely similar layout in the Power BI Power Query Editor, Modeling, and table or matrix visualizations. Plus, you'll open another entire world of visualizations and BI tools.
PowerBI Exercise
Let's do a sneak peek exercise in Power BI. It's a repeat of the last three lessons (Load Data, Refresh, Process GL data), but in a brand new tool.Install
Download exercise files
Bank account listing
GL Balances
Once in the Power BI Desktop application, close the initial pop-up menu, and let's start with the blank canvas.
Load Data


Browse to the exercise file "Bank account listing".
On the pop-up Navigator screen, select the box for “Sheet1”, which will provide a preview of the "Bank account listing" file. Select "Load".


Note the Fields section includes the column headers from the "Bank account listing" file.
Select all of the Fields, which will then generate a report in a table format.

Let's repeat these steps and load the source file "GL Balances" and name the query "GL_bal_Data".
Refresh

In the Power BI Dashboard, in the Fields section, GL_bal_Data, select the … for a menu of More Options. Select "Refresh data".

The balance in the query is now updated to reflect the Excel change.
Process GL Data


Split Column by Delimiter

Select the "Account" column by clicking on "Account". On the Home tab, select "Split Column", then "By Delimiter".

Change the "Select or enter delimiter" to "--Custom--" and a dash "-". Select to Split at the "Left-most delimiter". "Ok".

Power BI has now split the account column, guessed that the data type of the new column is a Whole Number (123) and recorded the steps under Applied Steps.


Repeat the same step to split the "Dept" column. Change the type for Dept.1 to Text. On the column header, click on the "123". Select "ABC Text".

Clean up

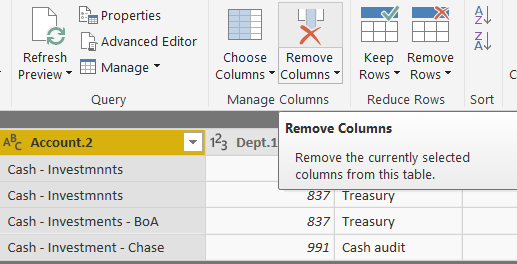
Let's do some clean up. Remove the column "Account.2" by selecting it, which highlights the column, and then selecting "Remove Columns" from the menu above.
Next, rename the columns "GL Account", "Dept", "Dept Name" and "Balance" by double clicking on the current column headers.


Let's change the GL Account column to data type "Text". On the column header, click on the "123". Select "ABC Text".

Now, select the column "Balance". On the Home tab, select "Data Type: Decimal Number" and change it to "Fixed decimal number".
This is one area which varies from Excel vs Power BI: the format is the same with a dollar sign and two decimal places but one calls it "Currency" and the other "Fixed decimal number".


If you've walked through both exercises in Excel and PowerBI, now you should see the 2 for 1 special that you are getting! According to Microsoft, there's a potential 4 for 1 special, since SQL Server Data Tools for SQL Server 2017 Analysis Services and Azure Analysis Services are also leveraging the same Power Query Editor platform; however, since many accountants aren't using these tools, it's a 2 for 1 special (with potential for more).
💥BEST PRACTICE TIP
As you start to explore on your own and Google how to perform new processes, alternate using "Power Query" or "PowerBI" in your search terms to get expanded results.💥
In this lesson, you learned in Power BI how to:
SOLUTION
Prior post: Process GL Data
Next post: Process Bank Account Listing
💬Before this exercise had you worked with PowerBI? Help shape future exercises by letting me know your experience level in the comments below.
Type
Now, select the column "Balance". On the Home tab, select "Data Type: Decimal Number" and change it to "Fixed decimal number".
This is one area which varies from Excel vs Power BI: the format is the same with a dollar sign and two decimal places but one calls it "Currency" and the other "Fixed decimal number".
TRIM
First, select each of the three Text columns holding down Ctrl. Then, on the Transform menu, select Format > Trim
.If you've walked through both exercises in Excel and PowerBI, now you should see the 2 for 1 special that you are getting! According to Microsoft, there's a potential 4 for 1 special, since SQL Server Data Tools for SQL Server 2017 Analysis Services and Azure Analysis Services are also leveraging the same Power Query Editor platform; however, since many accountants aren't using these tools, it's a 2 for 1 special (with potential for more).
💥BEST PRACTICE TIP
As you start to explore on your own and Google how to perform new processes, alternate using "Power Query" or "PowerBI" in your search terms to get expanded results.💥
In this lesson, you learned in Power BI how to:
- Install,
- Load data,
- Refresh data for changes,
- Split a column by a delimiter,
- Remove and rename columns,
- Change data types, and
- Use Trim to remove excess spaces.
SOLUTION
Prior post: Process GL Data
Next post: Process Bank Account Listing
💬Before this exercise had you worked with PowerBI? Help shape future exercises by letting me know your experience level in the comments below.
No comments:
Post a Comment